Login with Facebook in React Native and Nest.js
According to Statista, in the first quarter of 2021, over 2.85 billion users are using Facebook actively, turning Facebook to the biggest social media network worldwide.

This huge amount of users makes Facebook one of the best Identity Providers out there.
When you are developing a mobile app that provides Sign-in / Sign-up features, obviously, you want to make the authentication process easy as much as possible.
For users, using Identity Providers, such as Facebook, gives them a simple, fast, and secure way to sign-in to your application. No need for them to remember another email / password combination.
For your company, you will have less fake profiles, you are going to have more registrations, and you are going to have basic information about your users.
In this step by step article, you will find a complete guide on how to integrate Facebook in your application as an Identity Provider using React Native and Nest.js framework for Node.js.
Steps
- Create your Facebook App
- Configure Facebook App
- Configure React Native App
- Add Continue with Facebook button in React Native
- Add Continue with Facebook API in Nest.js
Prerequisites
- Node.js
- Facebook account
- React Native knowledge
- Nest.js knowledge
- Docker for running the Backend application
- OpenSSL for hashes generation
You will find the full code sample in this GitHub repository.
We will be using the new react-native-fbsdk-next.
1. Create your Facebook App
- Login in Facebook for Developers and create your app
- Go to My apps
- Click on Create app
- Choose Consumer app type

- Continue and type your app information, then Create App.
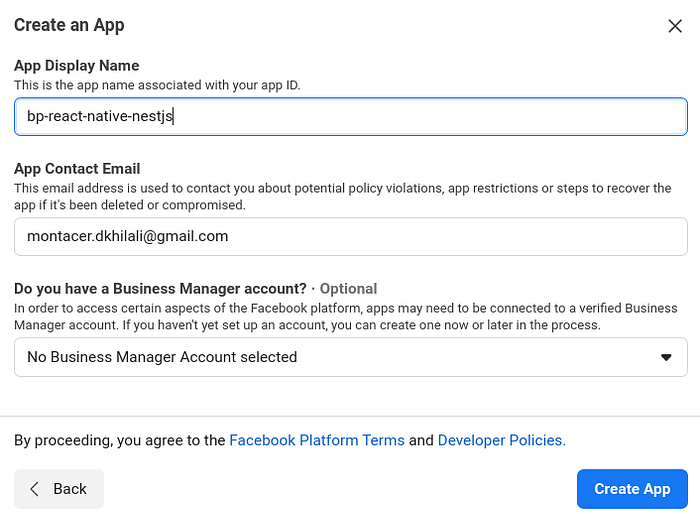

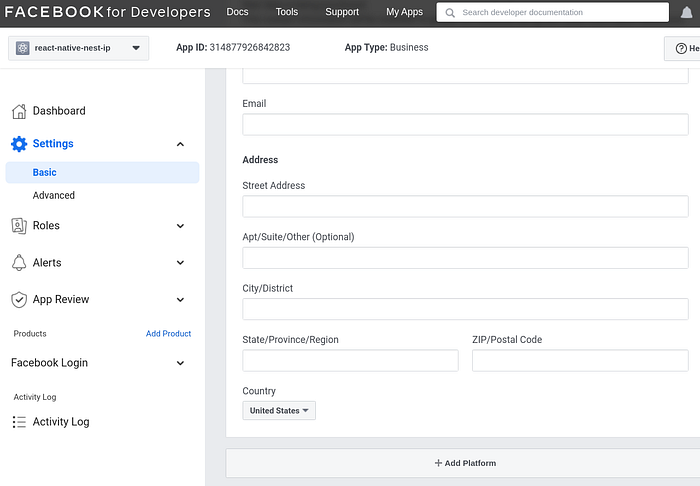
- You will be redirected to your app home page. Keep your App ID, you will use it later. Now, go to Settings → Basic and complete some information.
- For the ‘Privacy Policy URL’ and ‘Terms of Service URL’, you can generate an URL using this free tool.
- For the ‘Data Deletion Callback URL’ I’ll be using a dummy URL, but you should put the right URL to inform people how to delete their data from your app.

2. Configure Facebook App
Android platform configuration
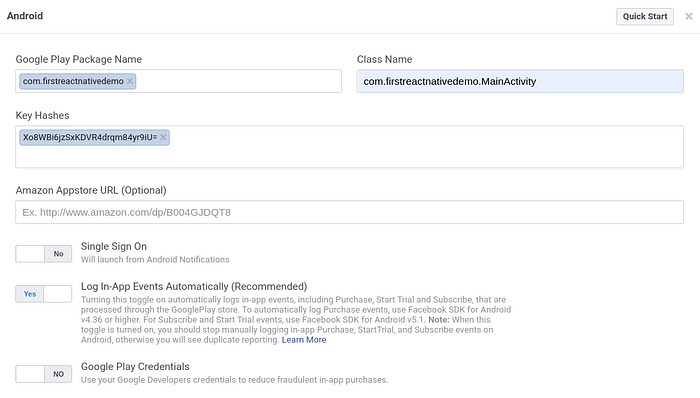
In the bottom of Settings → Basic page, click on Add Platform and choose Android.

You will be prompted with a form in which you will enter your Android app configurations :
- Grab the
applicationIdfromandroid/app/build.gradlefile and paste it in the Google Play Package Name input. - For the Class Name, you can put
applicationId.MainActivity, in my case, it will becom.firstreactnativedemo.MainActivity. - For the key hashes of your Android app, you can use OpenSSl toolkit by running this command on the
debug.keystorefile location.
> cd android/app
> keytool -exportcert -alias androiddebugkey -keystore debug.keystore | openssl sha1 -binary | openssl base64
PS: Check this question on Stack Overflow if you face some issues when generating key hashes.
iOS platform configuration
As we did for Android, we will click on Add Platform and then choose iOS. We will be prompted with a form in which we should type at least the Bundle ID.
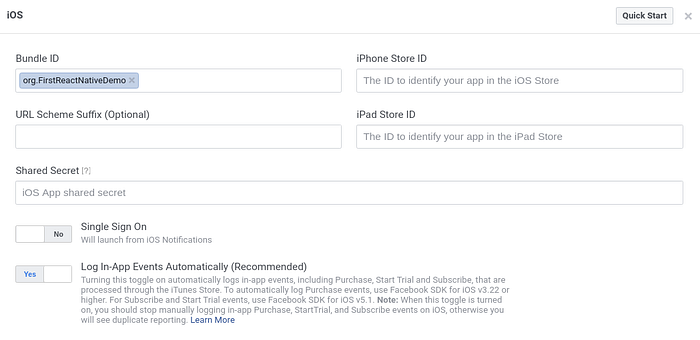
We can get the Bundle ID by opening the project using Xcode and going to General tab.

Live App
After finishing app configurations for linked platforms, you can make your app Live in order to be visible on Internet.

3. Configure React Native App
Install React Native Facebook SDK
If your React Native version is >= 0.60.0, you can use install the new version of React Native Facebook SDK react-native-fbsdk-next and it will be automatically linked to your project.
npm install --save react-native-fbsdk-nextYou can also use the archived version of the React Native Facebook SDK react-native-fbsdk for project using React Native version < 0.60.0.
For iOS only, you should run this command cd ios && pod install.
Setup React Native Facebook SDK for Android
Go to android/app/src/main/AndroidManifest.xml file and add the meta-data tag below the activity tag in order to declare the facebook_app_id string :
<manifest xmlns:android="http://schemas.android.com/apk/res/android"
  package="com.firstreactnativedemo">
    <uses-permission android:name="android.permission.INTERNET" />
    <application
      android:name=".MainApplication"
      android:label="@string/app_name"
      android:icon="@mipmap/ic_launcher"
      android:roundIcon="@mipmap/ic_launcher_round"
      android:allowBackup="false"
      android:theme="@style/AppTheme">
      <activity
        android:name=".MainActivity"
        android:label="@string/app_name"
     android:configChanges="keyboard|keyboardHidden|orientation|screenSize|uiMode"
        android:launchMode="singleTask"
        android:windowSoftInputMode="adjustResize">
        <intent-filter>
            <action android:name="android.intent.action.MAIN" />
            <category android:name="android.intent.category.LAUNCHER" />
        </intent-filter>
      </activity>
      <meta-data android:name="com.facebook.sdk.ApplicationId" android:value="@string/facebook_app_id" />
    </application>
</manifest>
Go to android/app/src/main/res/values/string.xml file and add a new string element with name of facebook_app_id and the value of your Facebook App ID That you will get it from your app in Facebook for Developers. This will link your Android app to Facebook app.
<resources>
    <string name="app_name">FBLoginDemo</string>
    <string name="facebook_app_id">242909083953522</string>
</resources>
Setup React Native Facebook SDK for iOS
- Open project using Xcode, right click on
Info.plistfile and select Open As → Source Code. - Insert the following XML snippet into the body of your file just before the final
</dict>element and replace{your_app_id}, and{your_app_name}with your app's App ID and name found on your Facebook App.
<key>CFBundleURLTypes</key>
<array>
<dict>
<key>CFBundleURLSchemes</key>
<array>
<string>fb{your_app_id}</string>
</array>
</dict>
</array>
<key>FacebookAppID</key>
<string>{your_app_id}</string>
<key>FacebookDisplayName</key>
<string>{your_app_name}</string>
<key>LSApplicationQueriesSchemes</key>
<array>
<string>fbapi</string>
<string>fb-messenger-share-api</string>
<string>fbauth2</string>
<string>fbshareextension</string>
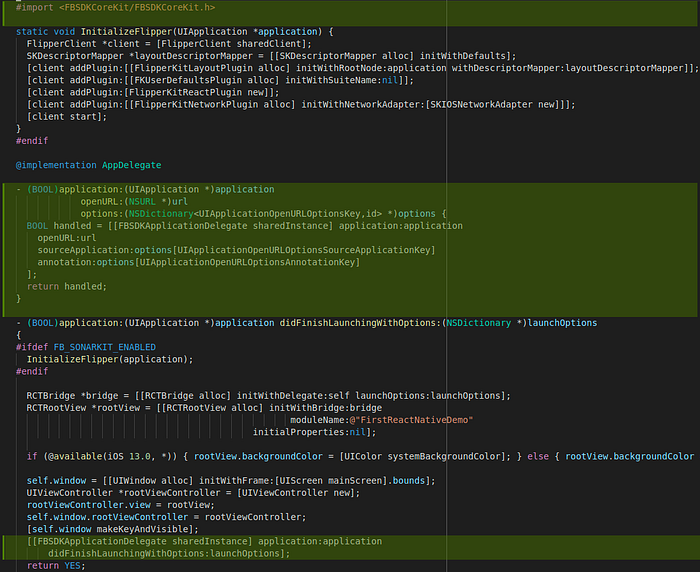
</array>In AppDelegate.m file, we’ll add some code in order to allow our React Native App to communicate with the Facebook App or Safari on the user’s iPhone by connecting the FBSDKApplicationDelegate object to the AppDelegate class.
#import <FBSDKCoreKit/FBSDKCoreKit.h>- (BOOL)application:(UIApplication *)application
    didFinishLaunchingWithOptions:(NSDictionary *)launchOptions {

  // You can skip this line if you have the latest version of the SDK installed
  [[FBSDKApplicationDelegate sharedInstance] application:application
    didFinishLaunchingWithOptions:launchOptions];
  return YES;
}- (BOOL)application:(UIApplication *)application
            openURL:(NSURL *)url
            options:(NSDictionary<UIApplicationOpenURLOptionsKey,id> *)options {BOOL handled = [[FBSDKApplicationDelegate sharedInstance] application:application
    openURL:url
    sourceApplication:options[UIApplicationOpenURLOptionsSourceApplicationKey]
    annotation:options[UIApplicationOpenURLOptionsAnnotationKey]
  ];
  return handled;
}
4. Add Continue with Facebook button in React Native
Finally, let’s write some code! In your React Native project, add a new facebook-button.js file with the code below and import the<FacebookButton /> component at the bottom of your sign-in.js screen.
In this code below we are returning some JSX with the Facebook button style (View all code example here). When clicking on this button, the handleLoginWithFacebook function will be called and it will get the access token from Facebook. After that, handleUserInfos function will be called and will fetch users information from /me endpoint of the Facebook Graph API.
Finally, we can the available user information to sign up user to our back-end application.
import { GraphRequestManager, LoginManager, GraphRequest, AccessToken } from 'react-native-fbsdk-next';
import Icon from 'react-native-vector-icons/AntDesign';
import { TouchableOpacity, Text } from 'react-native';
import React, { useContext } from 'react';import { Colors, Typography } from '../../styles';
import { AuthContext } from '../../store';
import styles from './styles';const FacebookButton = () => {
  const { signIn } = useContext(AuthContext);const handleUserInfos = token => {
    const userParams = { fields: { string: 'id,name,first_name,last_name,picture,email' } };
    const userProfileRequest = new GraphRequest(
      '/me',
      { token, parameters: userParams },
      (error, user) => {
        if (error) {
          console.error('Handle user infos error: ', error);
        } else {
          signIn(user, { fromFacebook: true, facebookToken: token });
        }
      },
    );
    new GraphRequestManager().addRequest(userProfileRequest).start();
  };const handleLoginWithFacebook = () => {
    LoginManager.logInWithPermissions(['public_profile', 'email']).then(
      login => {
        if (login.isCancelled) {
          console.log('Login cancelled');
        } else {
          AccessToken.getCurrentAccessToken().then(data => {
            const token = data.accessToken.toString();
            handleUserInfos(token);
          });
        }
      },
      error => { console.error('Handle Login with facebook error: ', error); },
    );
  };return (
    <TouchableOpacity onPress={handleLoginWithFacebook} style={styles.fbButton}>
      <Icon size={Typography.FONT_SIZE_28} name="facebook-square" style={styles.fbIcon} color={Colors.WHITE} />
      <Text style={{ color: Colors.WHITE }}>Continue with Facebook</Text>
    </TouchableOpacity>
  );
};export default FacebookButton;

5. Add Continue with Facebook API in Nest.js
Now we’re ready to add our /continueWithFacebook endpoint. (View all code example here).
First, create ContinueWithFacebookDto which will validate the endpoint passed body :
import { IsEmail, IsNotEmpty } from "class-validator";
import { ApiProperty } from "@nestjs/swagger";export class ContinueWithFacebookDto {
  @ApiProperty()
  @IsNotEmpty()
  public id: string;@ApiProperty({ example: "tester@test.com" })
  @IsEmail()
  @IsNotEmpty()
  public email: string;@ApiProperty({ example: "Super" })
  @IsNotEmpty()
  public firstName: string;@ApiProperty({ example: "Developer" })
  @IsNotEmpty()
  public lastName: string;@ApiProperty()
  @IsNotEmpty()
  public accessToken: string;
}
IJwtToken for the return type :
export interface IJwtToken {
  accessToken: string;
}
In auth.controller.ts file, add the new /continueWithFacebook endpoint declaration function :
@Post("/continueWithFacebook")
  public async continueWithFacebook(
    @Body(ValidationPipe) params: ContinueWithFacebookDto
  ): Promise<IJwtToken> { return this.authService.continueWithFacebook(params); }
We should update the user entity model in order to store the Facebook provider ID for a user in the database, so we won’t duplicate the same user on each connection. In this example, we are using PostgreSQL with TypeORM for Nest.js.
import { Column, Entity, Unique } from "typeorm";
import * as bcrypt from "bcrypt";import { UserRole } from "@common/constatns";
import { Base } from "@entities/base";@Entity({ name: "users" })
@Unique("UK_USER_EMAIL", ["email"])
export class UserEntity extends Base {
  @Column({ name: "email" }) email: string;@Column({ name: "first_name" }) firstName: string;@Column({ name: "last_name" }) lastName: string;@Column({ name: "role", type: "enum", enum: UserRole })
  public role: UserRole;@Column({ name: "fb_provider_id", nullable: true, unique: true })
  public fbProviderId: string;@Column({ nullable: true, select: false })
  password?: string;@Column({ nullable: true, select: false })
  salt?: string;constructor(user?: Partial<UserEntity>) {
    super();
    Object.assign(this, user);
  }public async validatePassword(pwd: string, salt: string, hashPwd: string): Promise<boolean> {
    const hash = await bcrypt.hash(pwd, salt);
    return hash === hashPwd;
  }
}
Finally, we add the continueWithFacebook function logic in the auth.service.ts file. In ths function we should check the validity of the user using the Facebook Graph API /me endpoint nad also check of the user is already signed in in our database. (FACEBOOK_ME_URL=https://graph.facebook.com/me)
public async continueWithFacebook(params: ContinueWithFacebookDto): Promise<IJwtToken> {
    const facebookData = await axios.get(
      `${process.env.FACEBOOK_ME_URL}?access_token=${params.accessToken}`
    );
    const providerId = facebookData.data.id;
    if (params.id !== providerId) {
      throw new UnauthorizedException("Invalid user id");
    } else {
      let user = await this.userRepository
        .createQueryBuilder("user")
        .where("user.email = :email", { email: params.email })
        .andWhere("user.fbProviderId = :providerId", { providerId })
        .getOne();
      if (!user) {
        user = await this.getUserRepository().signUp({
          firstName: params.firstName,
          lastName: params.lastName,
          fbProviderId: providerId,
          email: params.email,
        });
      }
      const accessToken = this.jwtService.sign({ id: user.id });
      return { accessToken };
    }
  }
Now, we can simulate our application and this is the final result :